In a previous post, I talked about embedding soap curls in soap. Although it takes a lot more work to do, embedding makes for a fun and interesting finished product. Here are a few examples:
 |
| Honeysuckle Soap with soap curls |
 |
| Bubble Gum Soap with soap balls |
 |
| Girly Girl Soap with pink soap shreds |
One great thing about making soap curls, shreds, balls, etc. is the opportunity to reuse leftovers from soaps that may not have turned out as originally planned. It also allows the soap maker to test out new colors without wasting extra ingredients. The Rosemary Mint Soap inserts were made when I tried out a new red mica. The color was not the true red I was looking for originally, but was perfect as an addition to my Rosemary Mint Soap.
 |
| Rosemary Mint Soap with vertical soap inserts |
Soap curls are actually very easy to make. First start by selecting the
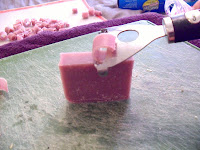
soap you will use. Using a potato peeler or handheld cheese slicer
(similar to what you see in this picture),carefully cut semi-soft soap into thin pieces. You want them to be thin enough to curl, but not so thin they are not able to be manipulated.

Using a pen or pencil, wrap the slices around the base and roll on a hard surface. Slide the curl off the end of the pen or pencil and voila! Soap curls!
 |
| Rolling the soap curls into shape using a pen |
 |
| Soap embeds air drying before use |
 |
| Finished soap curls |
Easy and fun. Let them air dry in a plastic bowl or another open air container for a few days and they will be ready to use in your next batch of soap.


No comments:
Post a Comment